 ProblemPick
How to Store Shoes in a Small Entryway
Keep only current everyday pairs at the entrance, preserve the full door swing and walking route, then match storage to the shoes: an open rack for quick access, modules or boxes for measured capacity, a door organizer for light items, and a tray for wet footwear.
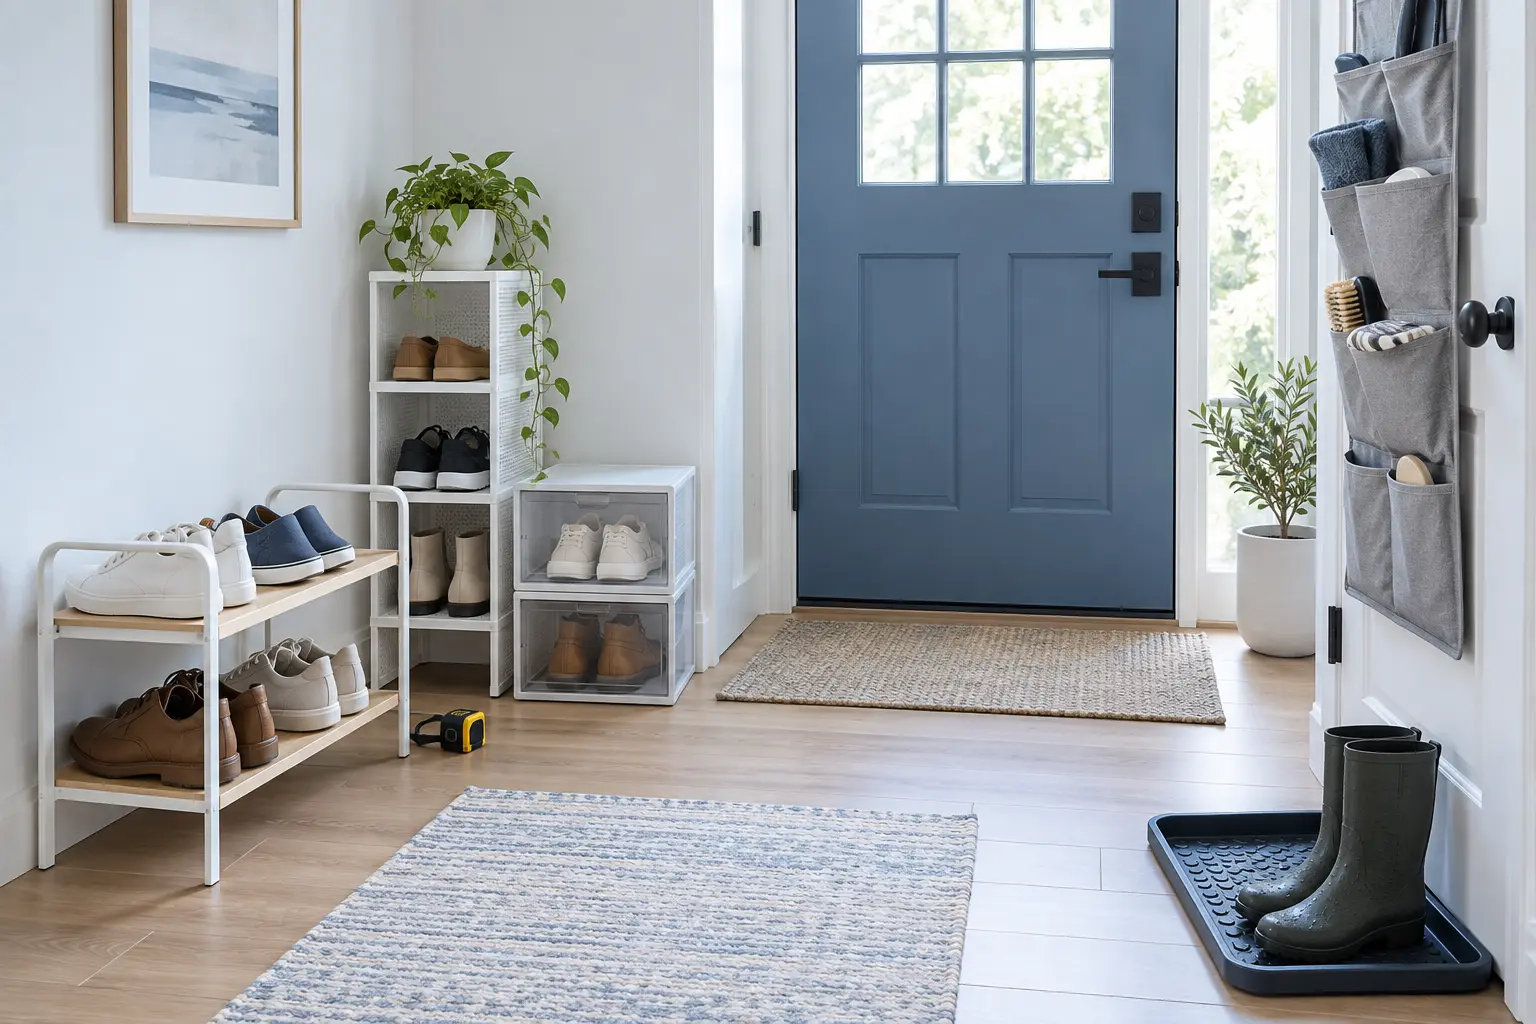
Keep the exit clear: Do not place shoes, trays, doors or modules where they obstruct entry, exit, locks, handles or the full door swing. Assemble and load every product as instructed, install any supplied restraint, and never climb on shoe storage.
How much of the entryway can shoe storage actually use?
Open the entry door as far as it normally travels and mark the area it sweeps. Measure the remaining wall length, usable depth, baseboard projection and clear walking width. Include handles, radiators, vents, switches and any interior door that opens into the same area. Those clearances matter more than a product’s capacity claim.
Count the pairs used during a normal week, then separate wet-weather footwear and occasional shoes. A small entry works better when the organizer serves the current routine rather than the entire household collection. The goal is one layer of reachable shoes, not more pairs hidden behind other pairs.
Which shoe-storage type fits your entryway?
Slim open shoe rack
Best for everyday pairs that need fast, visible accessA shallow two- or three-tier rack gives frequently worn shoes one repeatable place without hiding them behind a door. Open sides also make it easy to see when the rack has reached its real capacity.
- Benefits
- Quick access for daily pairs
- Easy to see and reset
- Available in shallow footprints
- Before you buy
- Measure the usable wall length, rack depth, shelf height and clear walking width after the door is fully open. Compare the maker's load limit, frame stability, foot finish and the actual inside width between supports.
- Possible drawback
- Shoes remain visible, open shelves still collect dust, and tall boots or wide shoes may not fit the shelf height or width.
Stackable adjustable shoe shelves
Best when the collection changes and the usable height can grow in controlled stepsSeparate shelf modules let you begin with the number of levels you need and change the spacing for flats, sneakers or ankle boots. A modular setup is useful only when the approved connections form a stable unit.
- Benefits
- Can adapt shelf spacing by shoe type
- Adds capacity in measured stages
- Individual modules may be easier to move
- Before you buy
- Check the permitted stacking arrangement, connectors, total height, level feet, shelf clearance and combined load limit. Follow every wall-restraint or anti-tip instruction and stop below any maximum stated by the maker.
- Possible drawback
- Unapproved stacking creates an unstable tower, and each frame or connector consumes some of the space you hoped to gain.
Front-opening shoe boxes
Best for occasional pairs that need dust protection but must remain individually reachableA front door lets you reach one pair without unstacking every box above it. Clear or labeled fronts can keep categories visible, while equal modules use a consistent footprint.
- Benefits
- Individual access without rebuilding a stack
- Contains dust and loose debris
- Repeated modules create clear categories
- Before you buy
- Measure the largest shoe in three dimensions and compare it with the usable internal dimensions, not the advertised outside size. Check door swing, ventilation, stacking method, maximum stack and cleaning instructions.
- Possible drawback
- Boxes use more material and volume than an open rack, and damp or dirty shoes should not be sealed inside.
Over-door pocket organizer
Best for light flats, slippers and accessories when the door is compatibleA hanging organizer uses otherwise empty door height and keeps the floor clear. It suits lighter, flatter items better than bulky boots or heavy footwear.
- Benefits
- Uses vertical space without taking floor area
- Keeps small pairs visible
- Can also separate shoe-care accessories
- Before you buy
- Confirm the door can close with the hooks and loaded pockets, and that the organizer does not interfere with the handle, hinges, seals or wall. Check pocket dimensions, total load limit and surface-contact protection.
- Possible drawback
- Hooks can prevent a tight close or mark the door, pockets limit shoe size, and added weight may be unsuitable for the door or hardware.
Washable boot or shoe tray
Best for wet, muddy or salty pairs that need a temporary landing zoneA raised-edge tray keeps loose water and debris in one washable place while footwear dries according to its care instructions. It is a containment tool, not long-term storage for the whole collection.
- Benefits
- Contains routine drips and loose dirt
- Simple to lift and clean
- Defines a temporary place for weather-exposed footwear
- Before you buy
- Measure the largest pair side by side, edge height, door clearance and the route to a sink or cleaning area. Choose a stable, floor-compatible material and confirm how it should be washed and dried.
- Possible drawback
- A tray occupies floor space, can become a trip obstacle in the wrong position and needs regular emptying and cleaning.
ProblemPick compares product types, not current listings. Amazon shows current products, prices, ratings, availability and seller terms after you choose to open it.
Quick product comparison
| Product type | Best for | Main limitation |
|---|---|---|
| Slim open shoe rack | Best for everyday pairs that need fast, visible access | Shoes remain visible, open shelves still collect dust, and tall boots or wide shoes may not fit the shelf height or width. |
| Stackable adjustable shoe shelves | Best when the collection changes and the usable height can grow in controlled steps | Unapproved stacking creates an unstable tower, and each frame or connector consumes some of the space you hoped to gain. |
| Front-opening shoe boxes | Best for occasional pairs that need dust protection but must remain individually reachable | Boxes use more material and volume than an open rack, and damp or dirty shoes should not be sealed inside. |
| Over-door pocket organizer | Best for light flats, slippers and accessories when the door is compatible | Hooks can prevent a tight close or mark the door, pockets limit shoe size, and added weight may be unsuitable for the door or hardware. |
| Washable boot or shoe tray | Best for wet, muddy or salty pairs that need a temporary landing zone | A tray occupies floor space, can become a trip obstacle in the wrong position and needs regular emptying and cleaning. |
What should you choose first?
Do everyday shoes form a loose row along the wall?
Start with a shallow open rack sized to that measured wall strip. Give each person or shoe type a defined section and stop adding pairs when access becomes double-layered.
Is width limited but a stable vertical zone is free?
Use approved stackable modules and adjust shelf gaps to the footwear. Build only the configuration shown by the maker, keep heavier pairs low and use restraints whenever the instructions require them.
Do occasional pairs gather dust or disappear at the back?
Front-opening boxes make each clean, dry pair accessible without dismantling a stack. Buy from the internal dimensions of your largest pair, not from a generic shoe-size label.
Are wet boots creating a second cleaning problem?
Give them a dedicated washable tray outside the door swing and main path. Once completely dry, move them to their normal shelf instead of letting the tray become permanent overflow.
How can the entryway stay organized after the first week?
For footwear that belongs with the rest of your clothes, use the same measurement-first method in our guide to organizing a small wardrobe without adding furniture. Browse more compact-space solutions in Organization guides.
Small-entryway shoe-storage checklist
Small-entryway shoe-storage FAQs
What is the best shoe storage for a very narrow entryway?
Start with the route, not the product. If a shallow rack leaves safe clear width with the door fully open, it is usually the simplest daily option. If no floor product fits, compare a compatible over-door organizer for light shoes or move occasional pairs to another room.
How many shoes should stay by the front door?
Keep the pairs used in the current routine and season. Set capacity by the measured organizer rather than forcing in an extra layer; move occasional, formal or off-season footwear to a separate storage area.
Are clear shoe boxes better than an open rack?
Boxes are better for occasional clean, dry pairs that need dust protection and individual access. An open rack is faster for everyday shoes and makes overfilling obvious. Boxes are not a good place to seal damp footwear.
Can I stack shoe racks or boxes as high as I want?
No. Use only the maker-approved stacking layout, connectors, load limits and maximum height. Follow any wall-restraint or anti-tip instruction, and do not treat shelves or boxes as steps.
Will an over-door organizer damage the door?
It can if hooks are too thick, the load is too heavy or contact points rub the finish. Check closing clearance, hinge and door compatibility, surface protection and the organizer's total load limit before use.
How should wet shoes be stored?
Place them on a cleanable tray where they do not block the route, remove loose dirt and dry them according to their material and care instructions. Do not seal wet footwear in a closed box.